A Guide on compiling and deploying your first Smart Contract to the Goerli Testnet using Hardhat.
I am a Solidity Engineer. I publish technical articles on Solidity and the EVM.
This guide will teach you how to use the Hardhat library to compile your Smart Contract and deploy it to a Testnet. This guide assumes that you have read my guide on: Welcome to Solidity, and as a result, we will not go over the primary definitions of Smart Contracts, we will jump right into a simple Hello, World contract code, which we deployed in Remix, in the Welcome to Solidity guide, and then we will set up the project on our local machine deploy to the local Hardhat blockchain before we deploy it to the testnet (Goerli), where you can then interact with the Smart Contract using the Goerli etherscan explorer.
As a practice, I find it convenient to write the Smart Contract in Remix and test it exhaustively using the Remix compile and deploy tools to ensure no errors in the Contract. Here is the code:
  // SPDX-License-Identifier: GPL-3.0

pragma solidity ^0.8.9;

contract HelloWorld {

  address public owner;
  string greeting;

  constructor(){
    owner = msg.sender;
  }

  function setGreeting(string memory _greeting) public {
     greeting = _greeting;
  }

  function getGreeting() public view returns(string memory) {
    return greeting;
  }

}
You can test in Remix and interact with it. Next, we will use Hardhat to build it on a local machine. Follow the instructions:
Choose a dir name for your project and create one
mkdir hello_world && cd hello_world
Initialize a project using npm default init command:
npm init -y
Hardhat is a Library and will have to be installed as a project dependency:
npm install --save-dev hardhat @nomicfoundation/hardhat-toolbox
@nomicfoundation/hardhat-toolboxis a hardhat plugin that has everything you need for developing smart contracts.
Set up hardhat in the project by running the command:
npx hardhat
Select the option: “Create a Javascript project”, follow the instructions and answer the prompts.
Open the ‘hello_world’ project in your IDE of choice. The directory will look something like the image.
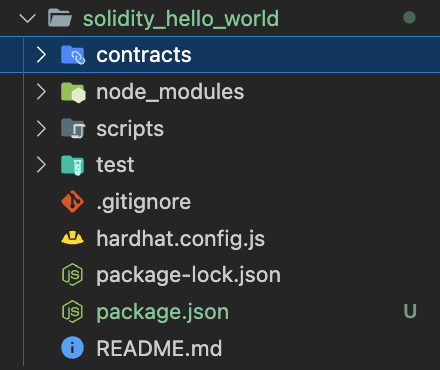
Open the Contracts dir. Delete the Lock.sol contract and create a new file: HelloWorld.sol, where .sol is an extension denoting that it is a solidity file. This is where our Smart Contract code will be written. Copy the HelloWorld code from Remix and paste into the file.
This article assumes that you have a basic understanding of how Solidity works. If you want a line-by-line breakdown of this code, you can read my guide: “Welcome to Solidity!”
The next step is to compile the Contract. This process will generate the Contract ByteCode that gets deployed to a chain and the Contract ABI, which we will need to interact with the Contract via a UI. In the terminal, run:
npx hardhat compile
You will see a message in the terminal:
Compiling 1 file with 0.8.17
Compiled 1 Solidity file successfully
After the compilation has completed, hardhat will create two folders in the project directory: artifacts and cache. Open the artifacts dir and go to contracts/HellowWorld.sol and open the file: HelloWorld.json. Here you will find the abi in an array. The last step of this session will be to deploy the Smart Contract to a local hardhat node.
Building Smart Contracts with Hardhat requires writing a script that is needed to indicate the network to deploy the Smart Contract. We will write a script to deploy the Smart Contract to a local node. Open the scripts folder in the directory and create a new file deploy_helloWorld.js, add the following code to the file:
const hre = require("hardhat");

async function main() {
  const Contract = await hre.ethers.getContractFactory("HelloWorld");
  const contract = await Contract.deploy();

  await contract.deployed();

  console.log(`Contract deployed to ${contract.address}`);
}

main().catch((error) => {
  console.error(error);
  process.exitCode = 1;
});
This script is an async function. First we imported the hre method from Hardhat. hre contains the sub methods that will enable us get access to a deployed instance of the code which we can connect with.
ethers.getContractFactory locates the contract HelloWorld in the contracts directory and assigns it to the Contract variable, which is then deployed by calling Contract.deploy() the result is assigned to the contract variable. An instance of the deployed contract is now available to be interacted with.
The last step of this session will be to deploy the Smart Contract to a local hardhat node. We first run the hardhat blockchain on our machine to deploy to a local hardhat node. This creates a local network and a set of private keys that can be used to deploy the contract to the local chain.
Open a separate terminal and run the command:
npx hardhat node
This will run a local hardhat node.
To deploy to the hardhat node, run the command:
npx hardhat run --network localhost scripts/deploy_helloWorld.js
You will see a message in the terminal:
Contract deployed to 0x….
In the terminal where the Hardhat node is running, you will see an instance of the contract deployed.
The Contract has been deployed successfully! The next step is to deploy the Contract to the Goerli Testnet.
The command for deploying the Contract to the Goerli testnet is similar to the command for deploying the contract to a local hardhat node.
There is an extra requirement to get an API Key from a node infrastructure service such as Alchemy. Alchemy provides a suite of infrastructure tools making it easy for developers to interact with various blockchain networks.
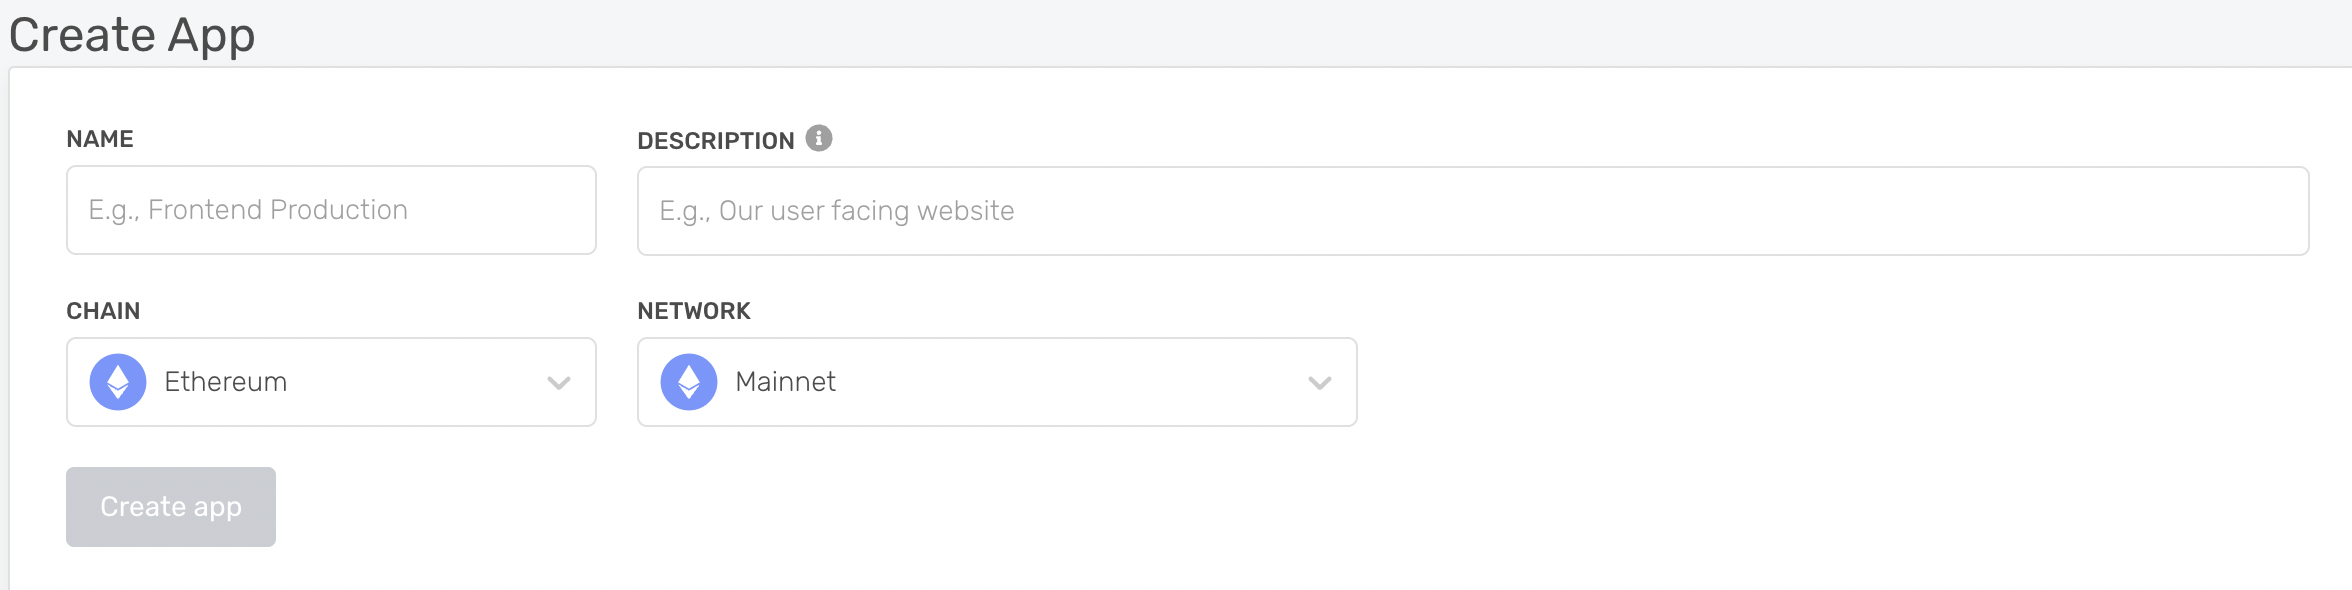
Sign up for an API key on Alchemy.
Click on Apps >>> Create an App
Fill in the input fields. Select Ethereum >> Goerli
On the newly created App dashboard, click on VIEW KEY and copy the HTTPS field. The key is the last string in the HTTPS url field.
In the Dapp, we will update the hardhat.config.js file. This file has a networks section where you can specify the various networks that you want to deploy your Smart Contract. During the course of deploying to the Goerli network, we will also need a private ethereum key, this can easily be obtained from your metamask wallet. This is a requirement because, you can only create contracts from a EOA.
To deploy the contract from the EOA you have selected, you will need some test ether. Get some test ether from the Alchemy Goerli faucet
It is recommended to mask the API keys especially if you are going to be pushing your code to a cloud repository. You can use the dotenv library to achieve this. To add the dotenv library to the code, open the terminal and install the dotenv library:
npm install --save-dev dotenv
In the root of the project directory, create a file .env This is where the Alchemy Key and the EOA Private Key will be saved. Update the file:
ALCHEMY_KEY=”your-alchemy-api-key”
PRIVATE_KEY=”your-metamask-private-key”
The next step is to update the hardhat.config.js file.
Import and set up the dotenv configuration.
require("dotenv").config();
Import the KEYS using process.env from dotenv and assign them to variables.
const PRIVATE_KEY = process.env.PRIVATE_KEY;
const ALCHEMY_KEY = process.env.ALCHEMY_KEY;
In the networks modules, add the configuration for deploying to Goerli:
goerli: {
      url: `https://eth-goerli.g.alchemy.com/v2/${ALCHEMY_KEY}`,
      accounts: [PRIVATE_KEY],
    },
The configuration is ready and the Smart Contract can be deployed to the Goerli network using the command:
npx hardhat run --network goerli scripts/deploy_helloWorld.js
Your Smart Contract is successfully deployed to Goerli Testnet!


