


In this article, I will walk through building your first NextJs project using React without Typescript. Next.js is a React framework for building full-stack web applications. NextJS is versatile and lets you create React apps of any size—from a mostly static blog to a complex dynamic application. Under the hood, Next.js abstracts and automatically configures tooling needed for React, like bundling, compiling, and more.
According to the React Developer Docs:
If you want to build a new app or a new website entirely with React, NextJS is one of the recommended React-powered frameworks popular in the community.
In this article, I’ll introduce NextJS, and we will build a simple app that fetches data from an API and displays it to a UI. It is an app that displays information on Countries, listing the Country Name, Capital and Flag.We will make use of the https://restcountries.com/ API. This article assumes that you have build applications in ReactJS, and want to learn how to start building applications with NextJS.
This tutorial is useful for you if you want to understand how to make fetch API queries and pass down props to components in NextJS using plain ReactJS without TypeScript.
To start our project, create a directory where you wish the project to live, and start a NextJS project
mkdir rest-countries-example && cd rest-countries-example

npx create-next-app@latest
The following prompts will run, select the answers I highlighted in CAPS.
What is your project named? rest-countries-example

Would you like to use TypeScript? NO / Yes

Would you like to use ESLint? NO / Yes

Would you like to use Tailwind CSS? No / YES

Would you like to use src/ directory? No / YES

Would you like to use App Router? (recommended) No / YES

Would you like to customize the default import alias? No / YES

What import alias would you like configured? @/*
We have selected not to use TypeScript, and do not have ESLINT setup for the project, and we will use Tailwind, App Router (as against Page Routing) and as a result, have our files located in a directory called src.
Open a terminal and run the following commands
npm run dev
Open your browser and go to https://localhost:3000 to see the project running.
Our Project Folder looks like this:

You can explore the tailwind.config.js file to see how Tailwind is configured for use in the application.
Open the page.js app. Remove the default code and leave a div with Hello World text in the component. Check your browser to the updated page with the text Hello World displayed on the screen.
export default function Home() {
    return (
            <div><p>Hello World!</p></div>
    );
}
There are 2 phases to our project. In the first phase, we will write a function to fetch the responses from the API, we can test the success of the calls by console logging the responses and also by parsing to the UI. We will create a UI using tailwind-style components, and render the responses to a beautiful UI. We will then create a component to demonstrate how to pass down props, which is no different from how it is done using plain ReactJS.
A steep learning curve for learning to build on NextJs is understanding the difference between Server Components and Client Components. As a result of the Reacts Hook useEffect which we will use in our app, we are leveraging Client components. Therefore, at the top of the pages.js we have to indicate this using the use client directive. At the top of the pages.js file add the line:
“use client”;
Phase 1.
We will use the JavaScript fetch API in our method to call the Rest Countries API. When the response is returned, we will hold the response in a useState array. Thus, as we write the method, we will also create a useState hook. We will also use the useEffect hook to prevent our page from rerendering.
const [countries, setCountries] = useState([]);
const getCountries = async () => {
const response = await fetch(
https://restcountries.com/v3.1/all
);
const data = await response.json();
setCountries(data);
};
useEffect(() => {
getCountries();
}, []);
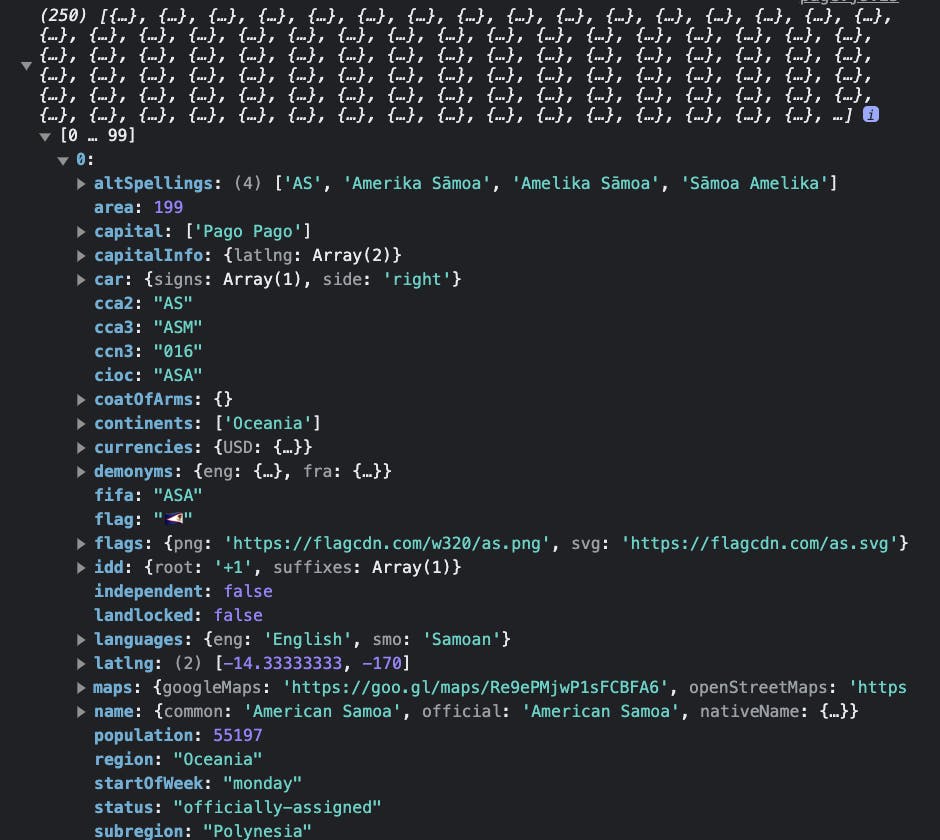
console.log(countries);
Open the Developer Tools on your Browser to see the Countries logged into the console.
Phase 2:
We have the data being returned from the API and parsed to the app, the next step is to create a beautiful UI using Tailwind CSS, and map over the responses in the Countries array held in the app state.
<div className={`grid gap-4 grid-cols-3 grid-rows-3 m-6`}>
    {recipes.map((result) => (
        <div className="max-w-sm rounded overflow-hidden shadow-lg" key={result.flag}>
            <p className="text-gray-900 text-xl">{result.name.common}</p>
            <p className="text-gray-700"> Capital: {result.capital}</p>
        </div>
    ))}
</div>
Now, you have a UI Displaying the Countries, and their respective capital.

At the onset of the article, we will display the Countries Name, Capital and Flag. Displaying images in NextJS provides a great learning curve. NextJS has it’s own Image component for handling image display. To use the component in our project, we have to import it:
import Image from 'next/image'
The component has its own default attributes such src, width, height etc. In our case where we are consuming an API that parses image assets, we have to configure our NextJS app to render the images from the URL paths we are parsing the image assets.
Open the next.config.js file where we will configure an Image Component attribute called remotePatterns. remotePatterns protects your application from malicious users. The configuration is required in order to use external images. This ensures that only external images parsed to remotePatterns can be served from the Next.js Image Optimization API. Update your next config like so:
const nextConfig = {
  images: {
    remotePatterns: [
      {
        protocol: "https",
        hostname: "flagcdn.com",
        port: "",
        pathname: "/w320/**",
      },
      {
        protocol: "https",
        hostname: "*.wikimedia.org",
        port: "",
        pathname: "/**",
      },
    ],
  },
};
Next, we will update the UI to display the flags. Right above the <p> tags, add the following Image component:
<Image
 src={flag}
 alt="Country flag"
 width={3200}
 height={100}
/>
The app is updated, and we can view the Countries Map. Name and Capital.

To illustrate the lesson on parsing down props to components, we can create a Countries component, move our Countries UI information to it, and pass down the props via the Component.
Create a file countries.js. We want to return the Country information, we can simply copy the code used in displaying the info to the UI in pages.js. Update the component:
import React from "react";
import Image from "next/image";


export function Countries({ label, flag, capital }) {
   return (
    <div className="max-w-sm rounded overflow-hidden shadow-lg">
      <Image
        src={flag}
        alt="Sunset in the mountains"
        width={3200}
        height={100}
      />
      <p className="text-gray-900 text-xl">{label}</p>
      <p className="text-gray-700"> Capital: {capital}</p>
    </div>
  );
}
In our pages.js app, import the Countries component
import { Countries } from "@/components/recipes";
Update the information being mapped over:
{recipes.map((result) => (
     <Recipes
          key={result.flag}
          label={result.name.common}
          flag={result.flags.png}
          capital={result.capital}
     />
))}
Now, the props are passed down via the component, and rendered by the Countries UI.
If you made it to the end of this lesson, Congratulations! The key learning takeaways is an understanding of how to use ReactJS Hooks in your NextJs app, handling image using the Image Component, and using the renderPatterns to “whitelist” addresses where you are parsing image assets via an API.
Here is the entire app for reference:
pages.js
"use client";

import { useState, useEffect } from "react";
import { Countries } from "@/components/countries";


export default function Home() {
  const [countries, setCountries] = useState([]);
  const getCountries = async () => {
    const response = await fetch(
      https://restcountries.com/v3.1/all
    );

    const data = await response.json();
    setCountries(data);
  };


  useEffect(() => {
    getCountries();
  }, []);


   return (
    <>
      <div className={`grid gap-4 grid-cols-3 grid-rows-3 m-6`}>
        {recipes.map((result) => (
          <Recipes
            key={result.flag}
            label={result.name.common}
            flag={result.flags.png}
            capital={result.capital}
          />
        ))}
      </div>
    </>
  );
}